smaconne のフォーム情報では、通常フィールド1つずつを割り当てるように設定しますので、Notes のフォームで表組をして表示しているものでも文書の編集ページでは以下のような表示となります。
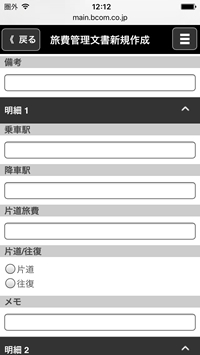
これを Notes と同じように以下のような表形式で入力できるようにする方法について記載します。
上記のスクリーンキャプチャにあるように、Notes のフォームでは、乗車駅、降車駅、片道旅費、片道/往復の別、メモの5つで1行を構成するようになっています。
各列の内容は以下の通りです。
フィールドの見出し
| 名前 | 種類 | 制御等 |
|---|
乗車駅/降車駅
| station01~station16 | テキスト
|
|
片道旅費
| fee1~fee8
| 数値
|
|
片道/往復の別
| return_sw1~return_sw8
| ラジオボタン
| 片道|0
往復|1
|
メモ
| memo1~memo8
| テキスト
|
|
smaconne のフォーム情報で、任意の場所にフィールド行を挿入して、以下のように設定します。なお、すでに「文書の参照ページで、フィールドの代わりに表を表示するようにしたい」で、表形式で表示するフィールドを設定している場合は、そのフィールドとは別に設定してください。その場合、既存の文書の参照ページ用の「明細」フィールドは「フィールドの非表示式」で「編集モードで非表示」チェックボックスを ON
にし、新しく作る文書の編集ページ用の「明細」フィールドは「フィールドの非表示式」で「読み込みモードで非表示」チェックボックスを ON にします。
- ラベル名: 「明細」(任意)
- フィールド名: (未入力)
- 編集時の種類: 「編集なし(表示のみ)」を選択
- 式: 以下の表を表示する HTML コードを生成する式を入力
(既存文書を編集する際は、こちらで表示されます)
tmp_0 := {<table border="0" cellpadding="0" cellspacing="0"><tr><th>乗車駅</th><th>降車駅</th><th>片道旅費</th><th>片道/往復</th><th>メモ</th></tr>};
tmp_9 :={</table>};
tmp := "";
@For(n := 1; n <= 8; n := n + 1;
	tmpInput1 := @If( n < 6; "station0" + @Text( n * 2 - 1 ); "station" + @Text( n * 2 - 1 ) );
	tmpFrom := @GetField( tmpInput1 );
	tmpInput2 := @If( n < 5; "station0" + @Text( n * 2 ); "station" + @Text( n * 2 ) );
	tmpTo := @GetField( tmpInput2 );
	tmpFee := @GetField( "fee" + @Text( n ) );
	tmpReturn := @GetField( "return_sw" + @Text( n ) );
	tmpMemo := @GetField( "memo" + @Text( n ) );
	tmp := tmp + {<tr>
	<td style="background: #f0f0f0;"><input name="} + tmpInput1 + {" id="} + tmpInput1 + {" style="width: 100%;" type="text" value="} + tmpFrom + {"></td>
	<td><input name="} + tmpInput2 + {" id="} + tmpInput2 + {" style="width: 100%;" type="text" value="} + tmpTo + {"></td>
	<td style="background: #f0f0f0;"><input name="fee} + @Text( n ) + {" id="fee} + @Text( n ) + {" style="width: 100%;" type="number" value="} + @Text( tmpFee ) + {"></td>
	<td>} +
	{<input type="radio" name="return_sw} + @Text( n ) + {" id="return_sw} + @Text( n ) + {" value="0"} + @If( tmpReturn = "0"; " checked"; "" ) + {>片道<br />} +
	{<input type="radio" name="return_sw} + @Text( n ) + {" id="return_sw} + @Text( n ) + {" value="1"} + @If( tmpReturn = "1"; " checked"; "" ) + {>往復<br />} + {</td>
	<td style="background: #f0f0f0;"><input name="memo} + @Text( n ) + {" id="memo} + @Text( n ) + {" style="width: 100%;" type="text" value="} + tmpMemo + {"></td>
	</tr>}
);
tmp_0 + tmp + tmp_9
- 新規作成時のデフォルト値: 以下の表を表示する HTML コードを生成する式を入力
(新規文書を作成する際は、こちらで表示されます。各フィールドの初期値はコードの中でセットします。)
tmp_0 := {<table border="0" cellpadding="0" cellspacing="0"><tr><th>乗車駅</th><th>降車駅</th><th>片道旅費</th><th>片道/往復</th><th>メモ</th></tr>};
tmp_9 :={</table>};
tmp := "";
@For(n := 1; n <= 8; n := n + 1;
	tmpInput1 := @If( n < 6; "station0" + @Text( n * 2 - 1 ); "station" + @Text( n * 2 - 1 ) );
	tmpFrom := "";
	tmpInput2 := @If( n < 5; "station0" + @Text( n * 2 ); "station" + @Text( n * 2 ) );
	tmpTo := "";
	tmpFee := 0;
	tmpReturn := "";
	tmpMemo := "";
	tmp := tmp + {<tr>
	<td style="background: #f0f0f0;"><input name="} + tmpInput1 + {" id="} + tmpInput1 + {" style="width: 100%;" type="text" value="} + tmpFrom + {"></td>
	<td><input name="} + tmpInput2 + {" id="} + tmpInput2 + {" style="width: 100%;" type="text" value="} + tmpTo + {"></td>
	<td style="background: #f0f0f0;"><input name="fee} + @Text( n ) + {" id="fee} + @Text( n ) + {" style="width: 100%;" type="number" value="} + @Text( tmpFee ) + {"></td>
	<td>} +
	{<input type="radio" name="return_sw} + @Text( n ) + {" id="return_sw} + @Text( n ) + {" value="0"} + @If( tmpReturn = "0"; " checked"; "" ) + {>片道<br />} +
	{<input type="radio" name="return_sw} + @Text( n ) + {" id="return_sw} + @Text( n ) + {" value="1"} + @If( tmpReturn = "1"; " checked"; "" ) + {>往復<br />} + {</td>
	<td style="background: #f0f0f0;"><input name="memo} + @Text( n ) + {" id="memo} + @Text( n ) + {" style="width: 100%;" type="text" value="} + tmpMemo + {"></td>
	</tr>}
);
tmp_0 + tmp + tmp_9
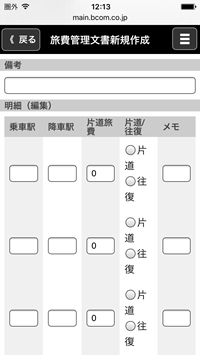
smaconne のアプリ設定文書を保存して、smaconne の文書の編集ページを再表示すると、以下のイメージのようにフィールドが表組で表示され、入力・保存することができます。
以上
ご参考:


